Outdoors Clothing Layering System
The layering system is the cornerstone of outdoor comfort and safety. Whether you're hiking through misty forests, scaling mountain peaks, or camping under the stars, understanding how to layer your clothing properly can mean the difference between an enjoyable adventure and a miserable experience.
The concept is elegantly and simple, instead of relying on a single heavy garment, you combine multiple specialized layers that work together to regulate your body temperature, manage moisture, and protect you from the elements. This system gives you incredible flexibility, by add layers when you're cold, shed them when you're warm, and adjust based on activity level and weather conditions.
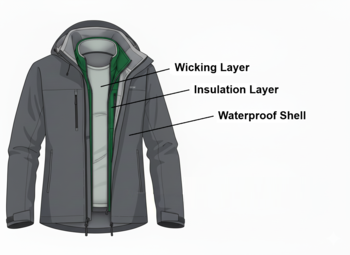
The three-layer system consists of a base layer that manages moisture next to your skin, an insulation layer that traps warm air, and a shell layer that protects you from wind, rain, and snow. Each layer has a specific job, and when combined properly, they create a microclimate that keeps you comfortable across a wide range of conditions.
Base Layer: Your Moisture Management
Purpose and Function
The base layer sits directly against your skin and serves one critical function: moving moisture away from your body. When you're active outdoors, you sweat, sometimes a lot. If that moisture stays against your skin, it will cool rapidly through evaporation, leaving you cold and clammy. A good base layer uses capillary action to wick sweat away from your skin and spread it across the outer surface of the fabric where it can evaporate without chilling you.
How It Works
Base layers use specialized fabric structures with hydrophobic (water-repelling) fibers on the inside that push moisture away, and hydrophilic (water-attracting) properties on the outside that spread moisture for faster evaporation. This creates a one-way moisture highway that keeps your skin dry while allowing body heat to be retained.
Material Choices
- Merino Wool: Nature's technical fiber. Merino regulates temperature exceptionally well, naturally resists odors (you can wear it for days), provides warmth even when wet, and feels soft against skin. It's more expensive and dries slower than synthetics, but many outdoor enthusiasts swear by it. Weight ranges from lightweight (150-200 gsm) for high activity to expedition weight (250+ gsm) for cold conditions.
- Synthetic Polyester/Nylon Blends: Engineered performance fabrics like Capilene, Coolmax, or generic polyester blends. These dry incredibly fast, are durable, resist abrasion, and cost less than wool. The downside is they retain odors more readily and don't regulate temperature as naturally as wool. Look for blends that incorporate features like odor-control treatments or mesh ventilation panels.
- Silk: Lightweight, compact, and soft, silk works as a base layer but is less durable and more expensive. It's a niche choice for ultralight backpackers or those with sensitive skin.
- Blended Fabrics: Many modern base layers combine wool and synthetic fibers (like 70% merino/30% polyester) to get the best of both worlds, wool's comfort and temperature regulation with synthetic durability and faster drying.
Contribution to the System
The base layer is your first line of defense against moisture buildup. By keeping your skin dry, it allows your insulation layers to work effectively and prevents the dangerous heat loss that occurs when moisture accumulates. Think of it as the foundation of your comfort, everything else builds on this layer's performance.
Insulation Layer: Trapping Warmth
Purpose and Function
The insulation layer's job is straightforward: trap dead air space to retain body heat. Your body generates warmth constantly, and the insulation layer creates air pockets that prevent that heat from escaping. This is your adjustable warmth dial: light fleece for mild conditions, puffy jacket for cold ones.
How It Works
Insulation works by creating thousands of tiny air pockets that slow heat transfer. Air is an excellent insulator, but it only works when it's still: moving air (wind) carries heat away rapidly. The insulation layer captures air in its fibers or fill material, creating a buffer zone of warm, still air around your body. The thickness and loft of this layer determine how much heat it retains.
Material Choices
- Fleece (Polyester): The workhorse of the mountains. Fleece is breathable, dries quickly, provides good warmth-to-weight ratio, and works well even when damp. It comes in various weights from 100-weight (thin, breathable) to 300-weight (very warm). The downside is it doesn't compress well and provides minimal wind resistance. Grid fleece variants like Polartec Power Grid enhance breathability and reduce weight.
- Down Insulation: The champion of warmth-to-weight and compressibility. Quality down (measured in fill power: higher is better, 600-900+) provides exceptional warmth for its weight and stuffs into tiny spaces. The traditional weakness is that down loses all insulating ability when wet, though modern water-resistant down treatments (like DWR coating on down clusters) partially mitigate this. Best for cold, dry conditions or when weight and pack size matter most.
- Synthetic Insulation: Made from polyester fibers (like PrimaLoft, Climashield, or Coreloft), synthetic fill insulates when wet, dries quickly, and costs less than down. It's bulkier and heavier than down for equivalent warmth, and doesn't last as long before losing loft. Ideal for wet Pacific Northwest conditions or as an active insulation layer.
- Wool Sweaters/Layers: Traditional but effective. Thick wool provides good insulation, resists wind reasonably well, and maintains warmth when damp. Heavier and less packable than modern alternatives, but time-tested and durable.
Contribution to the System
The insulation layer is your primary warmth control. It accepts moisture-free air from your base layer and creates a warm microclimate. Its breathability is crucial, if it can't allow moisture vapor to pass through, condensation will build up inside, compromising the entire system. This layer should be easy to add or remove as your activity level and conditions change.
Shell Layer: Protection from the Elements
Purpose and Function
The shell layer is your armor against the outside world: wind, rain, snow, and abrasion. It must block precipitation and wind from penetrating to your inner layers while simultaneously allowing moisture vapor from your sweat to escape. This seemingly contradictory requirement makes shell design one of the most technically challenging aspects of outdoor gear.
How It Works
Modern shells use waterproof-breathable membranes (like Gore-Tex, eVent, or proprietary alternatives) that work on a vapor pressure differential principle. These membranes have microscopic pores, small enough to block water droplets but large enough to allow water vapor molecules to pass through. When you're warm and active, vapor pressure inside your jacket is higher than outside, pushing moisture vapor out while keeping rain from getting in. The effectiveness depends on maintaining this pressure difference and keeping the outer fabric from "wetting out."
Material Choices
- Waterproof-Breathable Membranes: Gore-Tex, eVent, Pertex Shield, and others. These offer the best protection and breathability, but vary in performance. Three-layer (3L) construction bonds the membrane directly between outer and inner fabrics: most durable and breathable. Two-layer (2L) has a loose inner lining: lighter and cheaper. 2.5L is a compromise: lightweight but less durable. All require periodic DWR (Durable Water Repellent) treatment refreshing to maintain breathability.
- Waterproof-Breathable Coatings: PU or silicone coatings applied to fabrics. Less expensive than membrane shells, decent water resistance, but lower breathability. Good for casual use or budget-conscious buyers.
- Soft Shells: Stretchy, highly breathable, water-resistant (not waterproof) jackets that prioritize mobility and comfort over absolute protection. Best for high-output activities in dry or light precipitation conditions. Often incorporate fleece backing for warmth.
- Wind Shells: Ultra-light, packable jackets that block wind but offer minimal water resistance. Excellent for adding warmth without bulk in dry conditions or as an active layer on breezy days.
Contribution to the System
The shell completes the system by creating a protective barrier while allowing the base and insulation layers to function. A good shell prevents rain from soaking your insulation (which would destroy its effectiveness), blocks wind from stealing your hard-won warmth, and vents excess moisture. It's your final layer, only put it on when environmental conditions require it, as adding a shell reduces overall breathability.
The Problem with Cotton
There's an old saying in the outdoor community: "Cotton kills." While dramatic, there's truth to this warning. Cotton is comfortable in daily life but dangerous in the backcountry, and understanding why is crucial for outdoor safety.
Why Cotton Fails Outdoors
- Absorbs and Holds Moisture: Cotton fibers are hydrophilic, they love water. Cotton can absorb up to 27 times its weight in water and holds onto it rather than wicking it away. When you sweat, cotton becomes saturated and stays wet against your skin.
- Loses All Insulating Value When Wet: Wet cotton collapses, eliminating the air pockets that provide warmth. A wet cotton layer becomes a cold, clammy sheet against your skin, actively pulling heat away from your body.
- Dries Extremely Slowly: That absorbed moisture isn't going anywhere fast. Cotton takes hours or even days to dry in humid conditions, meaning you'll be cold for extended periods. In cool weather, this creates a dangerous situation.
- Heavy When Wet: Waterlogged cotton becomes heavy and uncomfortable, adding weight to your pack and creating chafing.
- Hypothermia Risk: The combination of moisture retention, loss of insulation, and slow drying creates perfect conditions for hypothermia, which can occur even in temperatures above 50°F (10°C) when clothing is wet and conditions are windy.
The Bottom Line: Save cotton for around town and the campfire. For any activity where you'll be sweating, exposed to potential precipitation, or away from immediate shelter, choose synthetic or wool base layers, fleece or synthetic insulation, and proper shell layers. The investment in technical fabrics is an investment in your safety and comfort.
Choosing Layers for Different Seasons
The beauty of the layering system is its adaptability. The same principles apply year-round, but the specific thickness, number, and type of layers change dramatically with seasons and conditions. Here's how to adapt your layering strategy throughout the year in the Pacific Northwest.
Summer (June-August): Low Elevation, Good Weather
- Base Layer: Lightweight synthetic or thin merino (150 gsm or less). For hot days, you might skip the base layer top entirely or use a moisture-wicking t-shirt.
- Insulation: A light fleece (100-weight) or windbreaker is usually sufficient, mainly for cool mornings, evenings, or unexpected weather changes.
- Shell: A lightweight, packable rain jacket. Summer storms in the mountains are brief but sometimes intense, having a shell is essential.
- Strategy: Minimize weight. You'll likely hike in just a t-shirt and shorts, with layers packed "just in case." The risk is lower at this time of year, but mountain weather can change rapidly.
Fall (September-November): Increased Precipitation Risk
- Base Layer: Midweight merino or synthetic (200 gsm), both top and bottom as temperatures drop.
- Insulation: Medium fleece (200-weight) or a light synthetic puffy jacket. Consider both a fleece for active use and a puffy for camp/rest stops.
- Shell: Robust waterproof-breathable jacket and rain pants. Fall is when Pacific Northwest rain begins in earnest.
- Strategy: Pack for variability. Early fall can still have warm days, but late fall conditions approach winter. Multiple lighter layers provide more flexibility than one heavy layer.
Winter (December-February): Cold and Wet
- Base Layer: Heavyweight merino or expedition-weight synthetic (250+ gsm), full top and bottom.
- Insulation: Heavy fleece or thick synthetic/down puffy jacket. Consider multiple insulation layers (fleece + puffy) for extreme cold or static activities like camping.
- Shell: Fully waterproof, breathable hardshell jacket and pants. No compromises: winter storms are serious.
- Strategy: Prepare for the worst. Winter in the mountains requires redundancy, if your primary insulation gets wet, you need backup warmth. Safety margins are critical.
Spring (March-May): Unpredictable Transition
- Base Layer: Midweight merino or synthetic (200 gsm). Spring can swing from near-freezing to warm.
- Insulation: Medium fleece and/or light puffy. Spring's variability demands flexibility.
- Shell: Waterproof-breathable jacket and rain pants. Spring rain is common.
- Strategy: Plan for four seasons in one day. Spring weather is notoriously fickle, bring more layers than you think you'll need.
Elevation and Exposure Considerations
These guidelines shift dramatically with elevation and exposure:
- Higher Elevation: Temperatures drop approximately 3-5°F per 1,000 feet of elevation gain. A pleasant 70°F valley bottom becomes a chilly 45°F at 5,000 feet. Add a layer category (treat summer high elevation like valley fall).
- Alpine/Exposed Ridges: Wind multiplies cold. Wind chill can drop effective temperature by 20-30°F. Carry wind protection even in summer.
- Coastal vs. Interior: Coastal areas stay milder year-round but are wetter. Interior areas see greater temperature extremes and drier conditions.
Activity Level Adjustments
Your exertion level dramatically affects layering needs:
- High Output (trail running, mountain biking): Fewer, lighter layers. You'll generate tremendous heat: focus on breathability and quick moisture management.
- Moderate Output (hiking, backpacking): Standard layering. Adjust layers when starting/stopping and during breaks.
- Low Output (camping, fishing, photography): More and heavier layers. Your body isn't generating much heat: insulation becomes critical.
System Tips and Best Practices
- Layer Early and Often: Don't wait until you're cold to add a layer, by then you've already depleted energy warming back up. Add a layer when you first notice cooling.
- Ventilate Before You Sweat: Open pit zips, remove a layer, or slow your pace before you start sweating heavily. Managing moisture is easier than dealing with it after the fact.
- The "Cool at the Start" Rule: Begin your hike feeling slightly cool. Within 10-15 minutes of moving, you'll warm up. Starting warm means you'll overheat quickly.
- Dry Your Gear Daily: At camp, hang damp layers to dry overnight or air them out during breaks. Accumulated moisture over multi-day trips reduces effectiveness.
- Keep a Dry Set for Camp: On longer trips, designate one base layer set as "camp only." Never wear it while active. This ensures you always have dry clothes for sleeping.
- Watch for "Wetting Out": When your shell's outer fabric becomes saturated, the membrane can't breathe effectively. Reapply DWR treatment when water stops beading on the surface.
- Adjust for Rest Stops: When you stop moving, your heat generation drops dramatically. Add an insulation layer immediately during breaks longer than a few minutes.
- Test Your System: Don't wait for a major trip to test your layering strategy. Practice on day hikes and local trips to understand what works for your body and activity style.
Mastering the layering system transforms outdoor experiences. It's not about having the most expensive gear, it's about understanding the principles and choosing the right combination for your specific conditions. A well-executed layering system keeps you comfortable, safe, and focused on enjoying the incredible wilderness of the Pacific Northwest rather than battling the elements.
Remember: the best layering system is the one you actually use. Start with the basics, learn how your body responds to different conditions, and refine your approach over time. The mountains will still be there tomorrow, take the time to prepare properly and enjoy them safely.